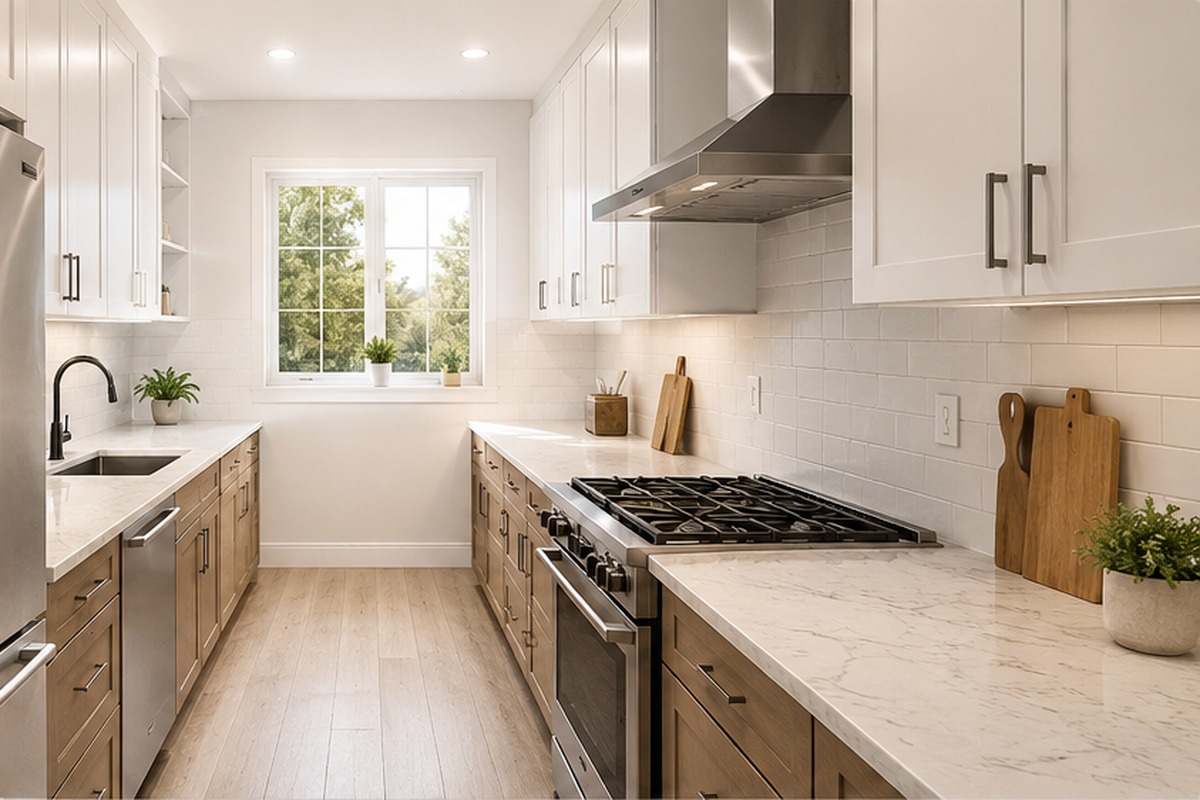
Plan an efficient galley kitchen layout from accurate room dimensions and fixed utility locations. Arrange the refrigerator, sink, preparation area, and cooking surface in a short sequence with enough counter space and aisle clearance.
Before approving cabinets, test the plan with appliance doors, drawers, and pullouts open. Check how one or two cooks will prepare food, clean up, and move through the room without blocking the main work area.
What Should You Assess Before Planning a Galley Kitchen?
Assess the finished room, fixed building conditions, and household routines before drawing cabinet runs. These inputs determine whether a double galley kitchen layout with two opposing runs will fit and which functions belong on each side.
Room Dimensions and Fixed Obstructions
Measure the room at floor, counter, and upper cabinet heights because walls may not be straight, parallel, or plumb. Note wall lengths, ceiling heights, corner angles, finished floor changes, trim, appliance panels, soffits, beams, columns, and radiators. Base the cabinet plan on finished surfaces. If the plan changes a wall or opening, ask a qualified local professional whether the work affects the structure.
Openings and Existing Utility Locations
Plot every door, window, passage, vent, drain, water line, gas connection, and electrical point. Include door swings, window operation, casing widths, and sill heights. A cabinet may fit the wall yet block trim, prevent a window from opening, or trap an appliance door against an entry.
Existing utilities may reduce construction work, but they should not dictate a poor layout. Moving the sink can affect drainage and venting. Moving the range can change the power, gas, and hood requirements. Ask the relevant trades to price relocation when it would improve the plan.
Household Use and Configuration Priorities
Define who cooks, whether two people work at once, and whether the aisle connects other rooms. Rank grocery unloading, food preparation, baking, drink making, pantry storage, and mobility needs before assigning cabinets. A broader residential interior design plan can connect these choices to nearby dining, entry, and storage areas.
How Should You Arrange Work Zones and Appliances?
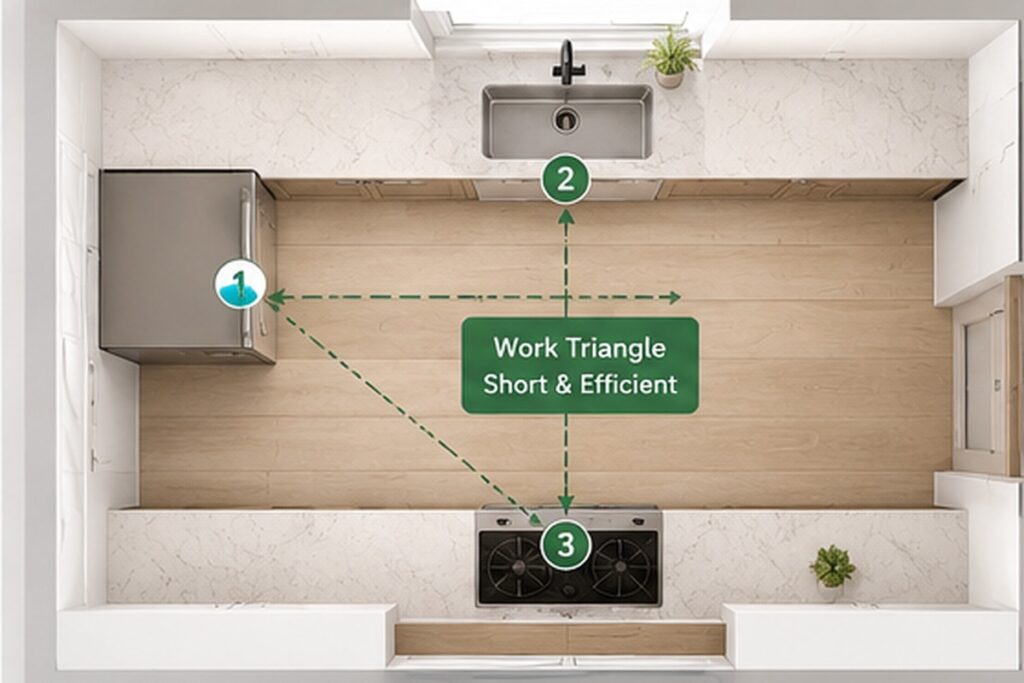
Arrange the refrigerator, sink, preparation area, and cooking surface in a short working sequence with counter space beside each task. The cook should not have to cross through household traffic to move between these zones.
Positioning the Refrigerator, Sink, and Cooking Surface
Place the refrigerator near the kitchen entry when possible so groceries can be stored without passing through the cooking zone. If the kitchen has one sink, position it beside or across from both the refrigerator and cooking surface.
Avoid putting the sink and range directly opposite each other when two people standing back to back would block the aisle. Keep the cooking surface away from a busy doorway and an operable window, and place it where the hood can reach a practical exterior duct route. Draw every appliance door and tall pullout fully open on the plan.
Preserving Landing and Food Preparation Space
Protect continuous counter before adding tall storage or extra appliances. NKBA treats the dimensions below as planning recommendations, not universal code minimums. Verify the selected appliance instructions and adopted local code. In a tight room, keep the largest uninterrupted counter between the sink and cooking surface.
| Work area | NKBA planning recommendation |
|---|---|
| Primary preparation area beside a sink | At least 36 inches wide and 24 inches deep |
| Sink landing space | At least 24 inches on one side and 18 inches on the other |
| Cooking surface landing space | At least 12 inches on one side and 15 inches on the other |
Allocating Storage Without Sacrificing Countertop Space
Place cookware near the range, waste near the preparation area, dishes near the dishwasher, and food near the refrigerator. Add a tall pantry only when its capacity justifies the counter it replaces. Check interior dimensions after allowing for cabinet sides, hinges, slides, plumbing, and fillers. The choice between framed and frameless cabinets can also affect clear openings and pullout access.
Upper cabinets can increase capacity without taking counter frontage, but a full run on both walls may make the room feel enclosed. Use the storage inventory, window position, hood, lighting, and reach range to decide where upper cabinets belong.
Keeping Through Traffic Outside the Main Work Area
Route household traffic past the end of the galley or along a separate edge when the room permits. NKBA recommends keeping major traffic out of the main work triangle and allowing at least 36 inches for a walkway. If other household members use the refrigerator or make drinks while someone cooks, place those functions near the entry. In a galley that connects two rooms, test the plan with two people in the aisle and the appliance doors open.
What Clearances Should You Check in a Galley Kitchen?
Measure clearances from the farthest-projecting cabinet, counter, appliance, or wall face. Then test the galley kitchen floor plan with doors, drawers, and pullouts open.
Work Aisle Space for One or Two Cooks
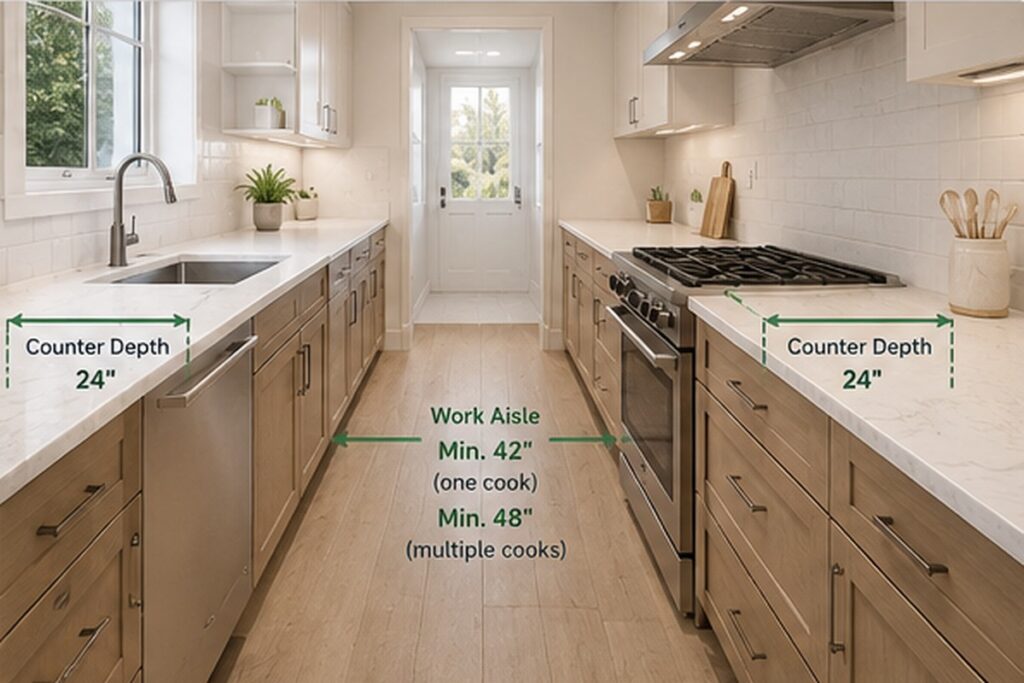
Set the aisle width before choosing cabinet depths. Measure between counter fronts, tall cabinet faces, and appliance fronts. NKBA and ADA dimensions serve different purposes, so the local authority and design professional must determine which requirements apply.
| Kitchen condition | Clearance |
|---|---|
| One cook under NKBA planning guidance | At least 42 inches between opposing work surfaces |
| Multiple cooks under NKBA planning guidance | At least 48 inches between opposing work surfaces |
| ADA pass-through kitchen, where applicable | At least 40 inches between the farthest-projecting opposing faces, with two entries |
Appliance, Cabinet, and Drawer Opening Conflicts
A galley kitchen layout drawing should show each opening arc, handle projection, pullout depth, and loading position. Size openings from selected model data because nominal width does not prove that an appliance can open, ventilate, or be serviced.
| Opening condition | Conflict to resolve |
|---|---|
| Dishwasher open | Sink access remains clear |
| Oven door open | The user retains standing space |
| Opposing drawers open | Fronts and handles do not strike |
| Refrigerator, pantry, or cabinet door open | The door clears nearby walls and handles |
Entry, End-of-Run, and Accessible Circulation
Keep entry doors from swinging into the work aisle when the room allows. At the end of each cabinet run, check whether handles, open doors, or counter corners project into the approach. A filler, finished end panel, shallow cabinet, or recessed appliance may resolve the conflict.
Accessible planning requires more than a wider center aisle. Where the ADA Standards apply, each appliance needs compliant clear floor space, and an open dishwasher door cannot obstruct the required clear space at the dishwasher or sink. Applicable residential units also need compliant work surface and turning provisions. These rules do not apply automatically to every private home, although they can inform a layout designed for wheelchair use or future adaptability.
What Must Be Verified Before the Layout Is Approved?
Verify appliance data, trade requirements, ventilation, and final field dimensions before releasing cabinets. A floor plan is not ready for production until the selected models and building services fit the same drawing set.
Checking Appliance Specifications Against the Cabinet Plan
Use the current installation manual for every appliance. Confirm product and cutout dimensions, door swing, handle projection, ventilation, mounting clearances, utility locations, panel requirements, support, and service access. Compare those requirements with the floor plan, elevations, cabinet schedule, and countertop drawings. If a model changes, repeat the review before production.
Coordinating Plumbing, Electrical, and Lighting Plans
Coordinate the sink, dishwasher, refrigerator water supply, disposal, and filtration equipment with the cabinet interiors. Keep valves, traps, junctions, and service points accessible. A drawer bank cannot occupy the same space as a drain or concealed outlet unless the drawings resolve the overlap.
Finalize appliance circuits, countertop receptacles, switches, cabinet lighting, and task lighting after the elevations are stable. A licensed electrician or electrical designer must apply the code adopted for the project. Use 3D interior design to review proportions and sightlines, but approve construction from dimensioned trade drawings and manufacturer data.
Confirming Cooking Ventilation and the Duct Route
Select the cooking appliance and hood together, then trace the duct to an allowed exterior termination. Section M1503 of the 2024 International Residential Code requires domestic cooking exhaust equipment to discharge outdoors through an independent, airtight duct with a smooth interior and backdraft damper. Listed ductless hoods are permitted under stated conditions. Section M1503.6 adds makeup air requirements when exhaust can exceed 400 cubic feet per minute and a qualifying fuel-burning appliance sits inside the dwelling’s air barrier. Local code adoption and amendments control the project.
Confirm the hood width, mounting height, airflow, duct diameter, allowable length, elbow limits, and termination position from the equipment instructions and mechanical plan. Show any opening through a cabinet, beam, or floor system before approving the layout.
Reviewing Final Dimensions and Local Requirements
Measure the room again after demolition when concealed conditions or new finishes may change the available space. Recheck wall lengths, corner angles, floor level, ceiling height, openings, utilities, and finished thicknesses. Record every correction in one coordinated drawing set so the cabinet shop, countertop fabricator, appliance installer, and trades use the same dimensions. The local architect, contractor, engineer, or code professional should review structure, accessibility, utilities, ventilation, permits, and installation within that person’s scope.
For projects that need design support before cabinetry is released, George Design Studio can coordinate the room layout with selected finishes and custom elements. The written scope should still assign responsibility for field measurements, technical drawings, permits, supply, and installation.
Frequently Asked Questions
Can a Galley Kitchen Include an Island?
A galley kitchen with an island works only when the room retains enough space for work aisles, open appliances, seating, and circulation on both sides. Many narrow galleys cannot meet those conditions. A shallow worktable or peninsula may fit better, but the plan still needs to be tested with doors open and people seated.
How Can Seating Be Added Without Blocking the Work Aisle?
Place seating at the end of a cabinet run, on the outer side of a peninsula, or in an adjacent dining area rather than inside the work aisle. NKBA recommends 32 inches behind a seated diner when no one passes, 36 inches for a person to edge past, and 44 inches for walking past. Measure from the table or counter edge and include the occupied chair.
Should a Galley Kitchen Have Upper Cabinets on Both Walls?
A galley kitchen does not need upper cabinets on both walls. Use two full runs only when the storage need outweighs the loss of light and visual width. A window, open wall area, or shorter cabinet run can reduce the enclosed effect, but the final choice should follow the storage inventory, hood, lighting, and reach requirements.
How Can You Make a Galley Kitchen Feel Wider Without Changing the Footprint?
Use a consistent cabinet grid, direct task lighting, limited material changes, and fewer breaks in the elevation. Lighter finishes may distribute available light, but color cannot correct a blocked aisle. Align cabinet tops, appliance panels, backsplash lines, and lighting before adding decorative details.
Are Galley Kitchens Outdated?
Galley kitchen layouts are not outdated. Two parallel runs can create short travel distances and long work surfaces, but the layout becomes difficult when through traffic enters the work area or tall units consume the preparation counter. Judge the layout by its measured clearances and daily use rather than by style alone.