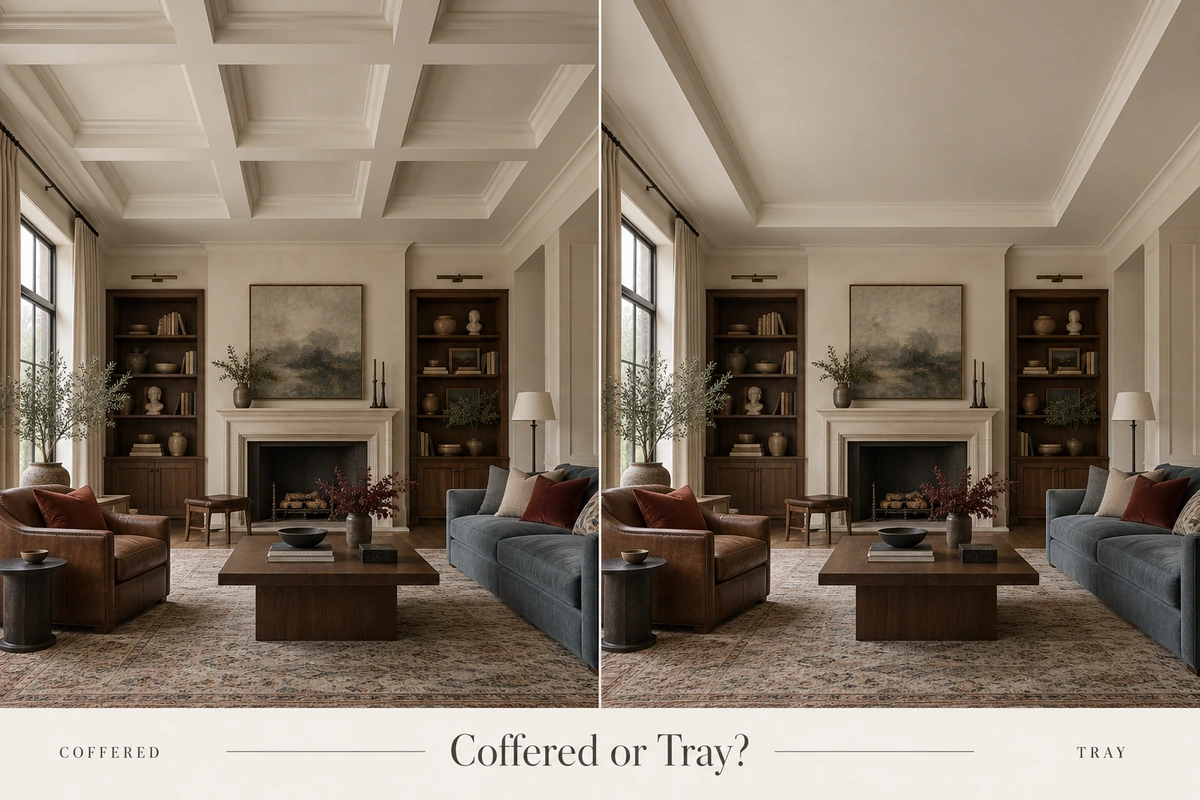
Choose coffered when the room can carry a grid across its whole ceiling, and choose a tray when you want to frame one zone. Otherwise, start from a flat ceiling and add depth only when the room gives you a reason. A coffered ceiling divides the surface into a grid of recessed panels. A tray ceiling has one broad central recess inside a lower border. Both take height and both add pattern, so the room’s proportions and its focal point should decide which one gets the job.
The mistake to avoid is choosing from a photo. A ceiling that looks great in someone else’s living room can drop a beam exactly where your chandelier hangs, or frame a patch of floor where nobody sits. Draw both options over your own furniture plan before you fall for either one.
See the Difference: A Grid or One Central Recess
Count the recesses. Coffering repeats them across the ceiling, so you see many small panels. A tray has one main recess, sometimes with one or more steps around its edge.
Coffer panels are usually square or rectangular, separated by intersecting beams or trim. In a tray, the center sits higher than the border. That’s all a photo can tell you. Whether the builder raised the center or lowered the border is invisible from below, and the difference shows up in your headroom.
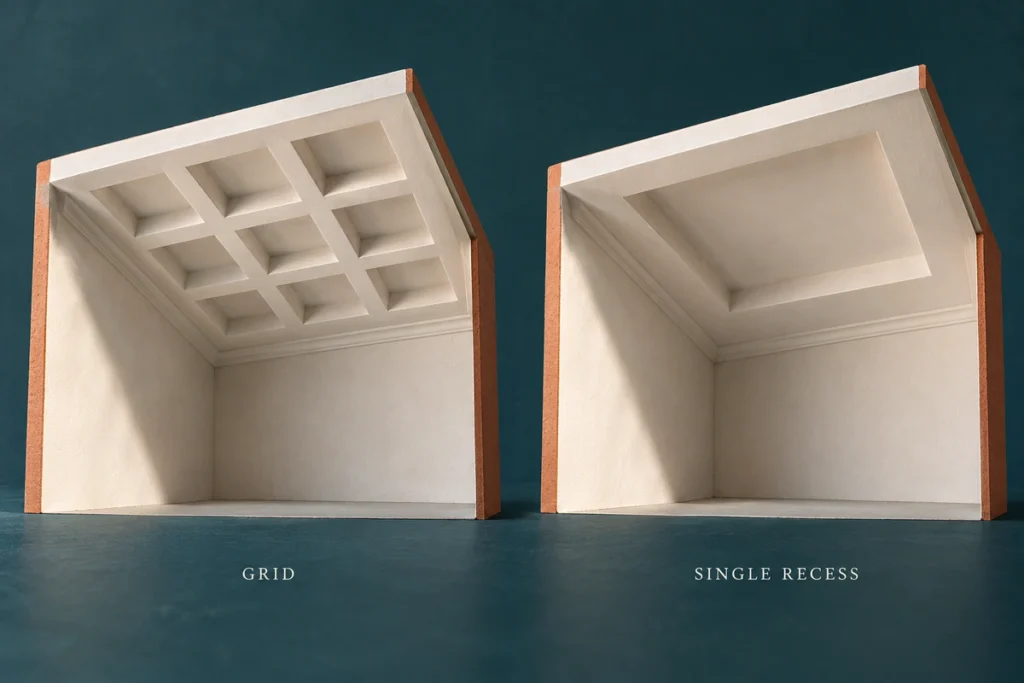
Illustrative ceiling shapes, not to scale or a construction detail.
Which Ceiling Is Worth Considering?
The right ceiling supports what the room is already about. If the main feature is on the walls or over the table, the ceiling should stay out of its way.
| Your Room or Priority | Consider | What Makes It Worth Testing |
|---|---|---|
| A large ceiling that looks blank and needs structure | Coffered | Repeated panels turn an empty expanse into a deliberate pattern |
| One seating or dining zone with a clear center | Tray | A single recess frames the group the way a rug does on the floor |
| Detailed doors, cabinetry, wall paneling, or a statement chandelier | A restrained tray or a flat ceiling | The room already has plenty to look at |
| You want the ceiling itself to show the craftsmanship | Coffered | The grid becomes the decoration |
| Low height, awkward bulkheads, or unknown conditions above the ceiling | Flat, or a much simpler design | The added depth may cost more than it gives back |
Compare the Details That Change the Choice
Two coffered ceilings can feel very different from each other. Panel count, border width, and depth decide whether a ceiling feels calm or busy, and how cleanly it meets the walls.
Room Proportions and Grid Size
Draw the grid to scale before anyone picks a panel count. Every extra division adds lines and intersections, and the eye registers each one. In a narrow room, a few long rectangles often sit better than a dense checkerboard, so put both on paper and compare. Then look hard at the edges. A neat center with skinny leftover strips along the walls looks like the grid ran out of room.
For a tray, the border and the opening trade space with each other. A wide border shrinks the center and makes the perimeter feel heavy. A narrow one gives more of the raised plane back to the room. Judge both from the doorway, where people first take in the room’s proportions.

Ceiling Depth and Usable Height
Get a section drawing before you get attached. It should show the finished floor, the lowest ceiling surface, and the highest recessed plane. What matters is how far the new work drops below today’s ceiling, not how deep the recess looks in a photo. A standard floor plan rarely shows ceiling heights or beam drops, so the plan alone can’t answer this.
A tray built by lowering the edges around an unchanged ceiling gives the center no extra height at all. The room has simply gotten lower around the outside. Applied coffering hangs below its surface too. Hold those lower edges up against the window heads, door trim, and pendant drops. When they start crowding each other, go shallower or stay flat. No single ceiling height settles this for every room, so trust the section over any rule of thumb.
Profiles, Finishes, and the Rest of the Interior
Match the ceiling’s detail to the room below it. Wide, plain coffer members belong with simple cabinet fronts and solid door frames. Layered moldings make sense where the doors, windows, and millwork already carry that kind of detail.
Crown molding on a tray is one more profile to coordinate, so set it beside a plain stepped edge and give the plain edge a fair chance. Either ceiling can work in a traditional or modern interior. Look at profiles, paint contrast, wood tones, and furniture shapes together. If the paneling and cabinetry already supply strong repeated lines, ask whether another grid brings order or just adds one more thing to look at.
Lighting and Competing Centers
A room can have three different centers: the center of the room, the center of the furniture, and the center of the ceiling. Mark all three on one drawing. A dining table pushed off-center by a sideboard or a walkway leaves a room-centered chandelier hanging over the floor beside it.
Place the main fixture by the furniture, then draw the ceiling around it. With coffers, make sure no beam runs through that spot. With a tray, make sure the opening wraps the furniture with room to spare. If you want concealed perimeter lighting, ask whether the strip will be visible from a chair or from standing height. And think twice about a downlight in every coffer. It looks orderly on the plan, but it lights the room for symmetry rather than for the way you use it.

Cost Drivers and Construction Stage
Detailing drives the price more than the ceiling type does. Price both options from drawings with materials and finishes defined. A coffered grid means repeated members, intersections, and a lot of surface to finish. A tray means perimeter work plus any steps, moldings, or lighting.
An elaborate tray that forces existing services to move could cost more than a plain decorative grid. Custom coffering with fine detail can also take substantial fabrication and finishing. Ask each quote to break out preparation, ceiling work, lighting changes, access, and repainting. It should also separate work planned before construction from work that means opening up a finished room and repairing it.
Put the Ceiling Back Into the Whole Room
Judge the ceiling with the furniture under it. The same room can suit either option, depending on what you want people to notice first.
Living Rooms
In a broad living room, lay the grid over the fireplace, window bays, and seating group. Pick the few lines that should align and let the rest go. Forcing every beam to hit a window or cabinet edge is how awkward grids happen.
If a stone fireplace or a big view already owns the room, put a simple tray and a flat ceiling in the running too. Where the living area opens to the kitchen or dining space, as in an open-concept kitchen and living room, stand in each zone and look back. A ceiling that feels balanced over the sofa can stop dead in the shared view.
Dining Rooms
The table comes first and the ceiling second. Fix the table’s position and likely size before centering anything overhead. A tray can frame the whole dining group. Coffers can surround a central fixture with repeated geometry, as long as the grid leaves a clean mounting point.
If you extend the table when you entertain, plan the ceiling around the extended table. Include the sideboard and the space people need to squeeze behind seated guests. Once the usable dining area is clear, a ceiling centered on the room shell may need to move.
Primary Bedrooms
Look at the ceiling from the bed first, since that’s the view you’ll see most, and then from the doorway. A simple tray can frame the sleeping area and keep the center quiet. Coffering earns a place when repeated architectural detail already runs through the room.
Include the headboard, wardrobe height, curtains, and any sitting area. In a large suite, decide whether the ceiling should describe the sleeping zone or the whole room. Settle the primary suite layout first, so a symmetrical ceiling doesn’t pull the bed onto a worse wall.

Comparing Complete Room Schemes
At GEORGE Design Studio, we plan residential interiors around the layout, lighting, cabinetry, finishes, and furniture. Compare each ceiling option with the door and window elevations, the furniture positions, and the material palette. A grid can suit the wall paneling and still fight the chandelier. A tray’s open center may give that same fixture room to breathe.
3D interior design lets you compare the grid and the tray at eye level, with your furniture and finishes in place, before anything is built.
Share your floor plan, ceiling heights, room photos, and reference images in a project brief. Tell us whether you’re building or renovating, which rooms connect, and what you want to keep, so we can discuss the ceiling as part of the overall design.
What to Confirm Before Approving a Design
Settle the look you want, then find out whether the room can support it. Before you approve the scheme, have the design and local project teams establish:
- Room dimensions and proposed finished ceiling heights
- The furniture layout, focal point, and main fixture positions
- Existing beams, bulkheads, and services that limit the available depth
- The intended ceiling construction, finish, and lighting scope
- What the estimate includes and who will verify it on site
New Construction
Bring the chosen ceiling into architectural and services coordination while those layouts can still change. Ask the team to show how the recess or grid fits below the structure and around equipment. If the plans can’t give you the center height or fixture position you want, this is the stage to solve it.
Whole-Home Renovations
Find out what’s above the finished ceiling before committing to a deeper recess or a raised center. A beam you can see may be purely decorative. Ekena Millwork’s Real Wood Beams FAQ, for example, identifies its hollow wood faux beams as nonstructural.
Structural changes and service relocations need verification by the responsible local professionals. If the look you want depends on alterations that are impractical for the project, compare a shallower treatment or a flat ceiling before going ahead.
FAQ
Should Adjacent Rooms Have the Same Ceiling Treatment?
No, connected rooms don’t need matching ceilings. Stand where you can see both and repeat compatible colors or profiles where that helps. A coffered dining room can sit next to a flat-ceilinged living room if the change happens at a clear room boundary. Borders that overlap in the shared view tend to look accidental.
Can You Combine a Tray Ceiling With Coffers?
Yes. A coffered tray ceiling places a grid of coffers inside the tray’s central area. Design the border and the grid as one composition, because their widths and depths add up. Keep both layers only if each one contributes something, since a simpler ceiling may leave the furniture and lighting easier to see.
Can You Simplify an Existing Tray Without Removing It?
Often, yes, if the problem is contrast or ornament: try a more consistent paint palette or simpler trim first. Paint won’t fix a tray that’s too low or off-center. Have the existing construction checked before removing anything, and treat a finish update and a rebuild as separate jobs.