Useful banquette seating dimensions come from the full seat, table, and access layout. Begin with occupied cushion height and effective seat depth. Then place the table top, underside, base, and surrounding clearance around the seated person.
The same method works for a breakfast nook or restaurant booth: each needs comfortable posture, an easy reach to the table, knee room, and a practical entry path. Restaurant banquette dimensions also depend on service flow, accessibility, egress, occupancy, and local codes. Kitchen-island stool counts, countertop overhangs, and island work aisles require a separate layout study.
What Banquette Seating Dimensions Should You Start With?
Use these ranges for the first drawing, then check the selected cushion and table as one assembly. They are common trade starting points, not final fabrication dimensions or universal standards.
| Item | Planning Start | What Controls the Final Dimension |
|---|---|---|
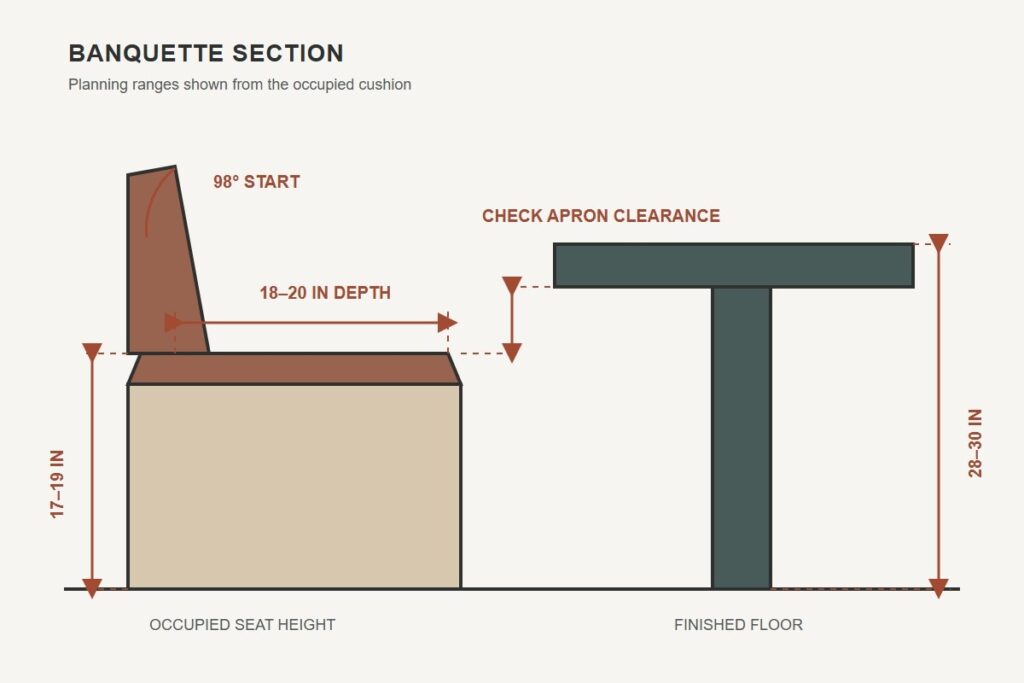
| Occupied finished seat height | 17-19 in. (430-485 mm) | Cushion construction, compression, user group, and table height |
| Effective seat depth | 18-20 in. (460-510 mm) | Back cushion thickness, back pitch, and desired dining posture |
| Dining back pitch | About 98° included, or 8° from vertical | Upholstery profile, lumbar support, and mockup response |
| Dining table top | Commonly 28-30 in. (710-760 mm) | Actual top, apron, accessibility requirements, and seat height |
| Seating length | Start near 24 in. (610 mm) per adult | Corner loss, body size, table legs, and end access |
Treat the occupied seat as the reference plane. A nominal 18-inch cabinet with a soft cushion may settle below the intended height. Thick back upholstery can reduce usable depth without changing the cabinet. Record the cabinet, foam, upholstery, and occupied finish separately. This coordination distinguishes loose furniture from built-in joinery.
How Should the Seat and Back Work Together?
Set the finished seat and back geometry before ordering the table. Changes in seat depth, back thickness, or cushion firmness move the diner relative to the table and affect both reach and comfort.
Finished Seat Height and Cushion Compression
Measure finished seat height from the completed floor to the top of the cushion under a representative seated load. The wood platform and an uncompressed cushion do not show the final seating position. Ask the upholsterer for the foam build-up and loaded design height, then place the sample on a rigid platform at that height. A cushion that settles too far can make the table feel high and bring the apron close to the thighs. A seat that remains too high can reduce foot support and knee clearance.
Effective Seat Depth and Back Angle
Effective seat depth runs from the front of the cushion to the point where the finished back supports the user. Measure after installing the back cushion; the wall or cabinet rear is outside this usable dimension. An 18-to-20-inch starting range supports upright dining for many adults. A deeper, lounge-like seat may need added back support and may increase the reach to the table. Start a dining-back mockup near 98 degrees included, or about 8 degrees from vertical, and adjust it for the padding, lumbar shape, seat slope, and expected dining time. Test depth and back angle together because either change moves the user’s hips and knees.
How Should the Table Fit the Banquette?
Choose the table after fixing the seated body position. A top can look correct in elevation while its apron, legs, or base makes the banquette difficult to use.
Table Height and Underside Clearance
A 28-to-30-inch dining top is a common planning range, but top height alone does not establish fit. Draw the underside, apron, brackets, and any cable or power components. The distance from the occupied cushion to the lowest obstruction is the usable vertical space above the thighs. Because cushion compression, body size, and table construction vary, verify that space with the selected table section or a manufacturer drawing. A slim top may provide more room than another table at the same height with a deep perimeter apron.
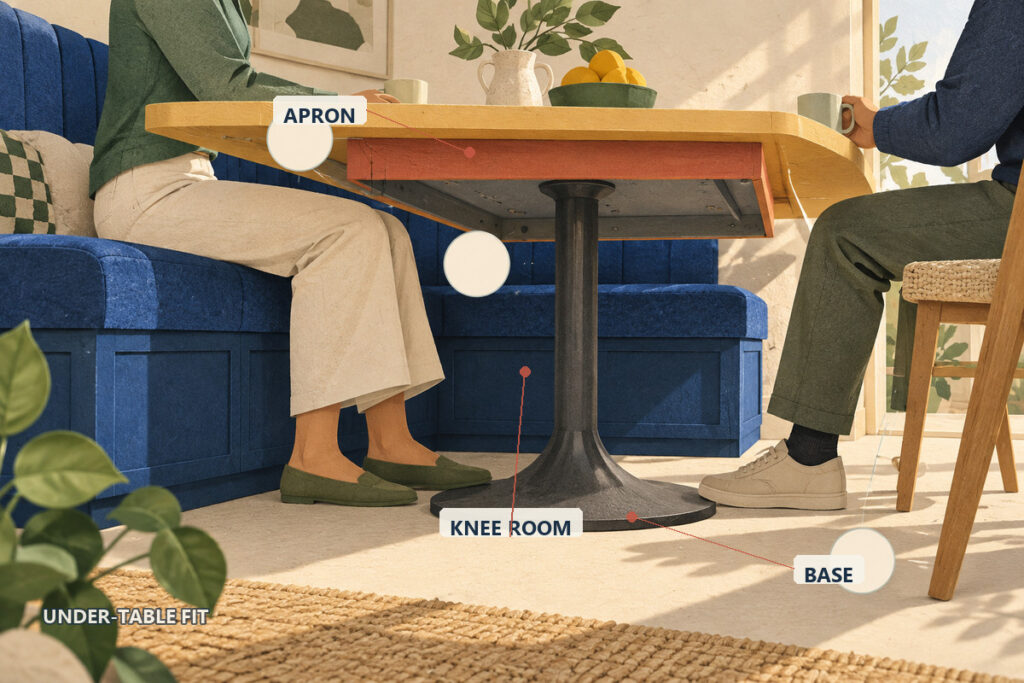
Table Edge, Base, and Leg Position
Place the table edge from the finished back support and the front of the occupied seat. The diner should reach a place setting without leaning forward through the meal and still have room to enter and turn. Seat depth, back pitch, top depth, and table movement all affect this relationship. In plan, include the complete base footprint. A centered pedestal can clear the entry side, although its plate and column still use foot space. Four corner legs may leave the center open but block side entry or trap the person near a wall. If the table has multiple pedestals, position them between seats and check knees, feet, and the exit path.
How Much Room Does the Full Layout Need?
Draw the occupied banquette, table, loose chairs, and nearby circulation in one layout. Empty furniture outlines omit the space used by seated bodies, pulled-back chairs, open doors, and service movement.
Straight Runs and Corner Banquettes
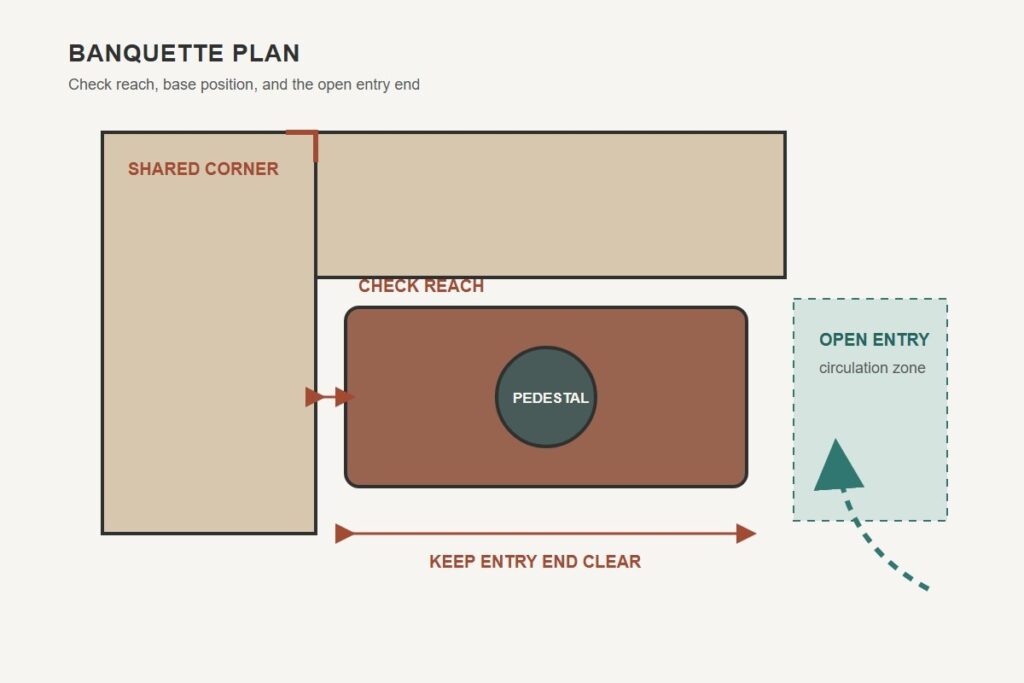
For a straight run, start near 24 inches per adult and deduct the length lost to arms, end panels, table legs, and walls. Confirm every occupied position before assigning capacity. For a corner banquette, calculate each run separately and count the inside corner as a shared zone. Two seats cannot use the same corner space. Plot hips, shoulders, knees, and the table edge around the turn.
Entry, Exit, and Chair Pullback
Keep a practical entry end open unless the table moves easily, and trace the route from the farthest seat. Other diners, table supports, wall edges, and loose chairs can all narrow that route. A table longer than the usable banquette may close the end and force people to slide behind others. If chairs face the banquette, show each chair both occupied and pulled back. The required remaining path depends on its use: a quiet breakfast nook, a main household walkway, and a server route do not need the same clearance. Island stools have their own circulation test in the kitchen island seating dimensions guide.
Reading the Section and Plan Together
Use the section to check occupied seat height, cushion compression, back pitch, table height, apron clearance, and reach. Use the plan for seat width, the inside corner, table depth, base footprint, entry, and circulation. Review both drawings after every change because a solution in one view can create a conflict in the other.
What Changes in a Commercial Restaurant?
A restaurant starts with the same seat-and-table fit, then adds operating and regulatory constraints. The layout must continue to work when nearby seats are occupied and staff are moving through the dining room. Use restaurant interior design projects for planning context, not as dimension standards.
Guest Turnover and Service Flow
Trace how guests enter and leave while adjacent seats remain occupied. Servers also need a clear approach for placing dishes and clearing the table without asking guests to move furniture. Map host, server, bussing, and accessible routes across the floor plan, including door swings, queues, columns, and fire-protection elements. The wider commercial interior planning process should settle these room-level conditions before fabrication. Match the banquette layout to the service model as well. Short meals may place more weight on quick entry and table access, while longer dining may require greater back support and personal space.
Accessible Dining Positions
Where the 2010 ADA Standards apply, at least 5 percent of seating and standing spaces at dining surfaces must comply with Section 902 and be dispersed. Each compliant dining position requires a forward approach, knee and toe clearance, a clear floor space of at least 30 by 48 inches, and a dining surface 28 to 34 inches above the finished floor.
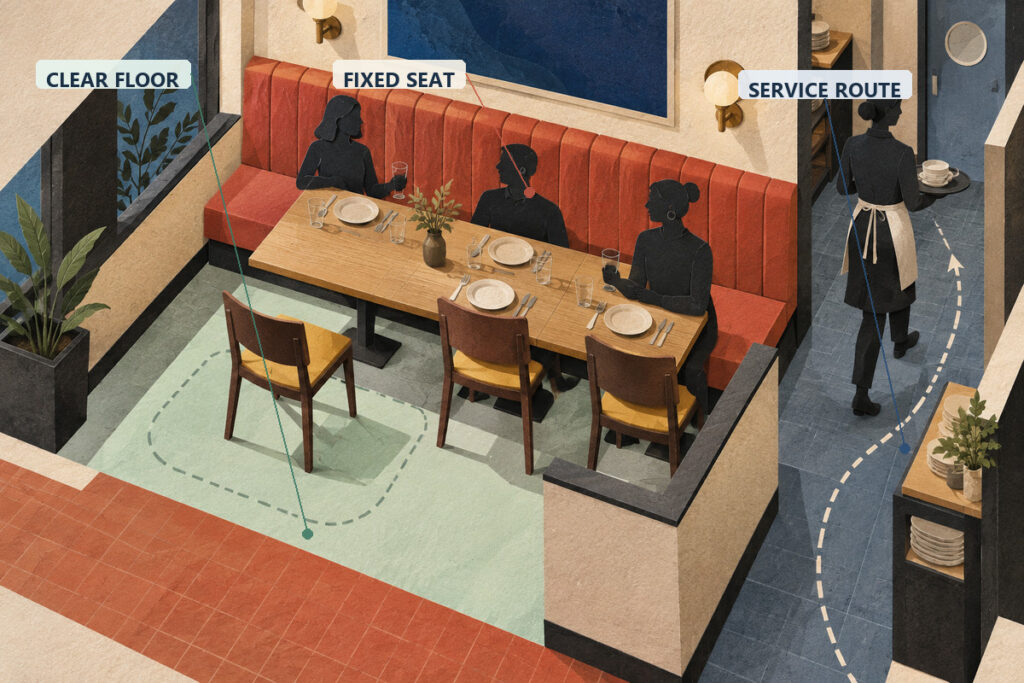
A fixed upholstered seat does not provide the clear floor position required for a wheelchair user. Include a compatible table edge in the dining area and keep its accessible route usable when nearby chairs are occupied. Confirm the governing standard and scoping with the local team because state and local rules may add project requirements.
Local Code and Project Coordination
Residential furniture guidance does not set restaurant aisle, egress, occupancy, or fire-clearance requirements. Those decisions depend on the adopted building and fire codes, project use, occupant load, exit arrangement, and authority having jurisdiction. Before fabrication, a qualified local architect or code professional should verify the plan. The banquette package should show finished floor levels, wall construction, backing, upholstery, seat and back sections, table drawings, power locations, cleaning access, and nearby building systems. The design team should also confirm material performance and maintenance needs for the jurisdiction and restaurant operation.
How Should You Verify the Layout Before Ordering?
Verify the complete assembly at full scale before approving custom work.
- Fix the finished floor, wall face, seat platform, foam build-up, back padding, and loaded cushion height.
- Add the exact table top, apron, base, and supports to the section and plan.
- Mark occupied bodies, loose-chair pullback, the entry end, and surrounding circulation.
- Build a full-size mockup with a representative cushion and table edge. Ask shorter and taller users to check reach, knee room, foot space, entry, and exit.
- For a commercial project, send the coordinated plan to the qualified local team for accessibility, egress, occupancy, fire, and permit review.
Revise any failed seat, table, or room-layout check before ordering. A 3D interior design review can coordinate visible seat, table, and room relationships, while the local qualified team remains responsible for site verification and regulated technical work.
Once the drawings and product information are confirmed, George Design Studio can review the design-stage next step.
Frequently Asked Questions
Does Banquette Seating Have to Be in a Corner?
No. A banquette can run along one wall, sit back-to-back as a divider, wrap a corner, or form part of an island-like dining area. Choose the form from the room layout, entry path, table support, and required seat count.
Should a Banquette Be Longer Than the Table?
The banquette usually needs exposed length at an entry end so a person can sit down and leave without climbing around the table. The exact difference depends on the open ends, whether the table moves, and the position of its legs or base. Check the farthest seat in plan before setting either length.
Can You Pair a Freestanding Table With a Built-In Banquette?
Yes, if the table’s height, underside profile, edge reach, base location, and stability suit the fixed seat. Obtain the table drawing and mock up the combination. Standard dining height alone does not confirm apron or support clearance.